The Docker for beginners guide explains the concepts. This one is different: we take a real Python API and put it in a container, end to end, and I show you the actual terminal output at each step. If you learn by doing, start here.
1. The App We Will Containerize
A tiny FastAPI service. Save it as main.py:
from fastapi import FastAPI

app = FastAPI()

@app.get("/health")
def health():
    return {"status": "healthy"}

@app.get("/items")
def items():
    return [{"id": 1, "name": "Widget"}, {"id": 2, "name": "Gadget"}]
And the dependency file requirements.txt:
fastapi==0.111.0
uvicorn==0.30.1
2. Writing the Dockerfile
The Dockerfile is the recipe for your image. This version uses layer caching deliberately — dependencies are installed before the code is copied, so changing your code does not trigger a reinstall:
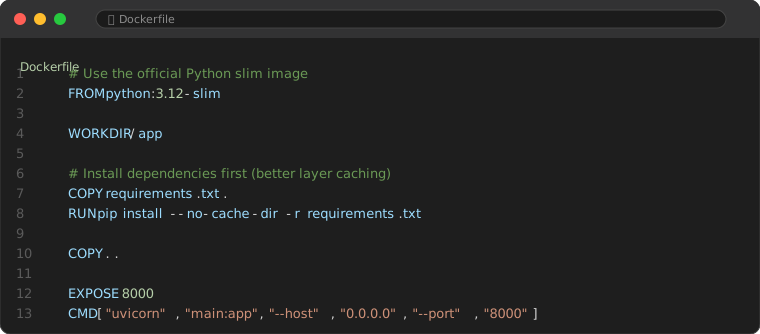
Each instruction:
| Line | Purpose |
|---|---|
FROM python:3.12-slim | A small Debian-based Python image (~50 MB vs ~900 MB for full) |
WORKDIR /app | All following commands run here |
COPY requirements.txt . | Copy just the deps file first |
RUN pip install ... | Install into the image layer |
COPY . . | Copy the rest of your code |
EXPOSE 8000 | Documents the port (does not publish it) |
CMD ["uvicorn", ...] | Runs the server when the container starts |
3. Add a .dockerignore
Without it, COPY . . pulls in .venv, __pycache__, and .git — bloating the build context. Create .dockerignore:
__pycache__
*.pyc
.venv
.git
.env
Dockerfile
.dockerignore
4. Build the Image
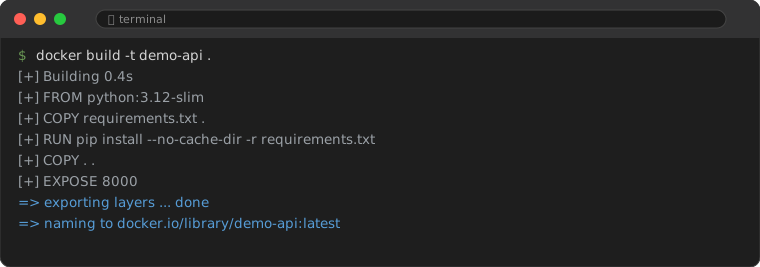
From the project folder, tag the image demo-api:
docker build -t demo-api .The output shows each instruction running as a layer. On a second build, unchanged layers are reused instantly:
5. Run the Container
Map host port 8000 to the container's 8000, and run in the background:
docker run -d --name demo -p 8000:8000 demo-apiThe -p 8000:8000 part is what makes the API reachable from your browser. Verify it is up:
docker ps
curl -s localhost:8000/health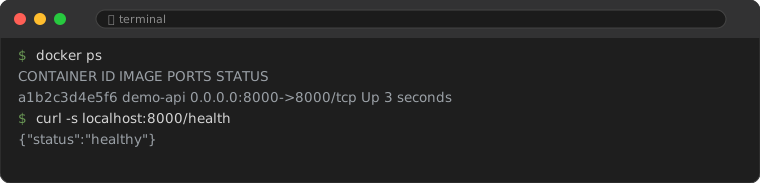
6. Passing Configuration
Real apps need environment variables. Pass them with -e:
docker run -d --name demo \
  -p 8000:8000 \
  -e ENVIRONMENT=production \
  -e LOG_LEVEL=warning \
  demo-api
Read them in Python with os.environ["ENVIRONMENT"]. Never bake secrets into the image — inject them at runtime.
7. Pitfalls I Have Actually Hit
- Running as root. Add
RUN useradd -m appuser && USER appuserfor production. Containers running as root are a security risk. - Missing
--no-cache-dir. Without it, pip caches wheels inside the image, adding megabytes. Keep it. - Port not published. If
curl localhost:8000hangs, you forgot-p.EXPOSEalone does not publish. - Bind mounting over your code. A volume mount like
-v $PWD:/appoverwrites the image's code with your local files — great for dev, confusing in prod.
8. When to Reach for Docker Compose
One container is fine. When you need the API plus a database plus a cache, a docker-compose.yml defines them as one unit. That is a topic for the beginners guide's Compose section — the patterns here (Dockerfile, build, run) are the foundation.
Frequently Asked Questions
Why python:3.12-slim and not just python:3.12?
The slim variant drops build tooling and docs, cutting the image from roughly 900 MB to ~50 MB. You rarely need the full image for a web service.
How do I rebuild after code changes?docker build -t demo-api . again, then docker rm -f demo && docker run ... to replace the running container. With the layer cache, only the COPY . . layer rebuilds.
The container exits immediately after starting. Why?
Usually the CMD process ended (or crashed). Run without -d to see the logs, or docker logs demo to read them after the fact.
You now have a reproducible, portable Python service. Ship the image to any Docker host and it runs identically. That is the whole point of containers.